Animating Purplebricks front-end
Before we started building the latest version of Purplebricks marketing website, our great design department came out with the most exciting features. As you probably expect reading this, half of them were very hard to implement on all browsers. SVGs triggered by scroll event, things popping out of (and into) the screen plus different versions and behaviour on a responsive design.
The main objective of our re-design was a super fast and clean homepage that would make people understand who we are and why should they book valuations with us. Using graphic elements as opposed to wall of text, we wanted to give this modern, quirky style to the process that for so long has been stuck in the middle ages - selling your home.

The aim of this post is to give you an idea of how we created a simple mechanism to take care of all “animated” elements on any given page.
The idea was that as user scroll the page down, we would show certain elements, sometimes with fancy animation effect, sometimes just fading in. They would have to appear in a specific order - top to bottom, then left to right. We wanted to make it bulletproof - here at Purplebricks we release daily, and our designs tend to change a lot. So to make sure there will be as little overhead with maintaining it, we came up with our animation controller:
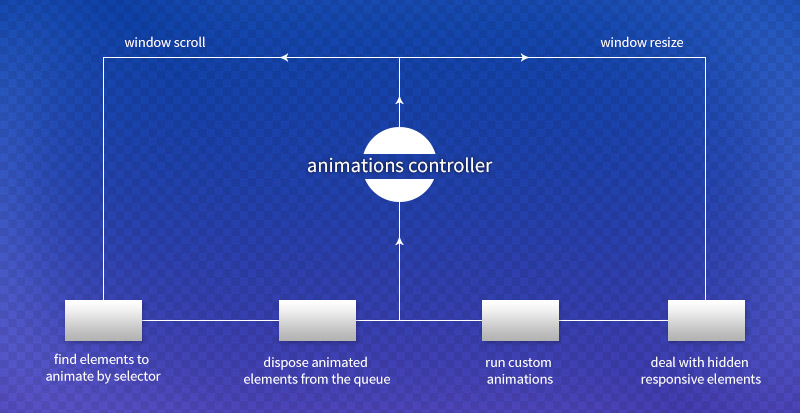
We could divide the mechanism in a few simple steps:
Step 1: On a given page, find all elements to animate and store them in an array.
In order to let the controller know about what to show on a page, we’ve added a class “.animated” to those elements. In CSS, that class has an opacity set to 0. When the page loads, the javascript will scan for any elements with .animated and push to an array. We will also store its top/left position later to make the onScroll event work nicely.
1
2
3
4
5
6
7
$('.animated').each(function () {
    animations.push({
        el: $(this),
        top: 0,
        left: 0
    });
});
Just after we store them in an array, we run a function that first reads and sets the top/left position, and then sorts them by how are they displayed in the DOM. Starting with top of the page, and zig-zagging down.
1
2
3
4
5
6
7
8
9
10
11
12
13
14
15
16
17
18
var currentAnimations = [];

// populating offsets
for (i = 0, n = animations.length; i < n; i++) {
    animation = animations[i];
    animation.top = animation.el.offset().top;
    animation.left = animation.el.offset().left;

    currentAnimations.push(animation);
}

// sorting them
currentAnimations.sort((a, b) => {
      return a.top > b.top ? 1 : (a.top < b.top ? -1 : (a.left > b.left ? 1 : -1));
});

// and finally we add the animations to our main array which is accessible to all methods
animations = currentAnimations;
Imagine that below the white squares are divs on a page. The idea is to sort them in the array like this:
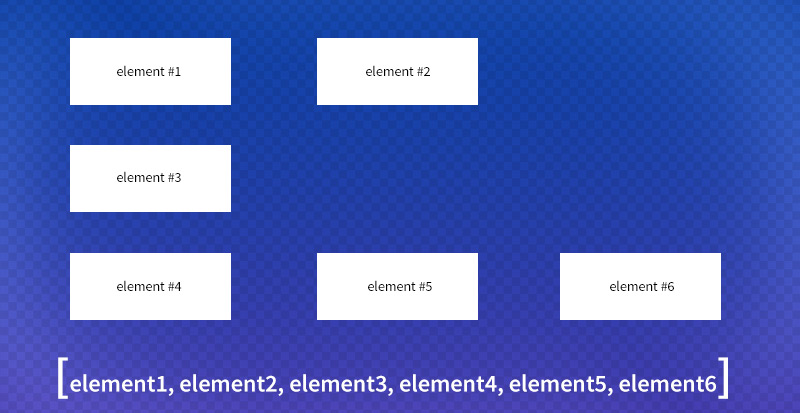
All the sorting is happening in our offset method, which is also hooked in to window.onresize event. This way when user changes the orientation of their device or they resize the browser window, we will run all of that again and re-calculate position followed by re-sorting the array.
Step 2: When scrolled to the element, fire it
Next is where the magic happens! The following method animateOnScroll() is hooked in to - you’ve guessed it - the one and only window.onscroll event. With every page scroll it will contact our animations array, check the window.scrollTop values and if they match with individual elements, they will be executed and eventually discarded.
Let’s illustrate it with some code:
1
2
3
4
5
6
7
8
9
10
11
12
13
14
15
16
17
18
19
20
21
22
23
24
25
26
27
28
29
30
31
32
33
34
35
36
37
38
var animateOnScroll = function() {

var topDistance, toAnimate, applyAnimations;

if (animations && animations.length > 0) {
    // our app has an winOb object that always has the current window height and offsets.
    // We read from it and add 15% of the screen height to trigger animations when they are in the view.
    topDistance = purpleApp.winOb.top + (purpleApp.winOb.height * 0.85);

    // because we sorted animations before by their offsets, the first one will be the one to animate
    if (topDistance > animations[0].top) {
        toAnimate = [];

        // push element to animate to temporary toAnimate array, then remove it from main animations array using shift().
        while (animations && animations.length > 0 && topDistance > animations[0].top) {
            toAnimate.push(animations.shift());
        }

        // lastly, from our temporary animations array, we run each through the following method:
        applyAnimations = function() {
            var n = toAnimate.shift();
            if (n && n.el) {
                // we can define a name of the custom function that will fire as well as fade in
                if (n.el.data('animation')) {
                    runCustom(n.el.data('animation'));
                };

                // the actual fade in
                n.el.addClass('animateNow').velocity("transition.slideUpIn", {
                    duration:300,
                    complete: applyAnimations
                });
            }
        }
        applyAnimations();
        }
    }
};
As you can see, we can pass any function to run along the fade-in. All we need to do in the front end is to add a data attribute with the name of a function next to our animated class. Inside those mini functions we have completely isolated logic for each individual animation. Setting elements to rotate with intervals, fade in a sequence of children elements, etc. All the timing and animation execution is happening in the core animation controller and all these mini components work together on top of it to make it much more exciting. This way, whatever happens to front end, we only have to amend the custom animation function, and never think about where it is located in the DOM.
We also use css3 animations. Remember the animated class? when the element is animated, it will receive an additional class called animateNow. We have selectors that target various divs with it and use transitions and all the other great css3 motion logic. For instance when a cup of coffee appears on the screen, we use a simple keyframe selector to make the steam ‘puff’ from the mug.
For majority of fade-ins and custom animations we use velocity.js. It’s a fantastic little library that is much faster at animating DOM elements than jQuery. It also has cool set of predefined transitions which we sporadically use. Check it out here! We got so inspired by it’s performance that we now run all our resize/scroll events using only two main events hooked in to main app on the entire website. I mean, who would like to create countless window.resize or window.onScroll events all over the place. This way our page performance is much better than before.
There are other things that the controller is doing:
- when collecting elements to animate, it will note its visibility and if the element is hidden, it means that it will be need run as part of responsive logic - so it will be assigned to hiddenAnimation array. If window onResize happens, and the new media queries will kick in, the sorting will take those hidden animations under considerations and re-queue them.
- depending on the page, you might have a very long scroll with multiple animations to fade in. It would be really bad if a user scrolled down the page really fast, and because animations are sequential - it can take x seconds to animate everything above fold and finally get rid of the unpleasant white space where the user has been looking at for a while now! That’s why we have timers set, and if the page has been scrolled ridiculously fast (could be a bookmark half down the page, could be the user being impatient), then animations above the fold will run all at the same time.
To sum up, having this little piece of kit allows flexibility. We can have multiple designs and fire custom animations with them. We can even A/B test them. The controller is getting new features from time to time, and this can only get better. We can’t say we’ve solved all our problems with it, there is always room for improvement - but that’s a good thing, right?
Posted in Programming with : JavaScript, CSS, Front-end